Mistakes happen to even the most attentive developers when working with Git repositories. Let’s say that you have a commit containing an error; you have a few options for how you can undo a Git commit.
In this case, let’s imagine the erroneous commit is not your last commit, and you don’t want to lose any of the work in between. For example, your mistake could have impacts on the commits that follow it, so by altering one commit, you might want to remove a commit, change a commit message, or squash some of those commits together.
Here is where interactive rebase comes in. Rather than abandoning all of the commits after the commit containing an error, you can apply them again and analyze the impacts of your changed history commit by commit.
Interactive rebase in Git is a tool that provides more manual control of your history revision process. When using interactive rebase, you will specify a point on your branch’s history, and then you will be presented with a list of commits up until that point. From here, you have multiple options for each commit:
- Pick: keep the commit as it is currently in the history
- Drop: remove the commit completely from the history
- Squash: combine the commit with the one before it
- Reword: change the Git commit message
Once you’ve made your selection for each commit in the rebase, Git will move commit by commit from the oldest to the newest, attempting to apply the changes requested.
Resolving Conflicts with Interactive Rebase
It’s important to note, conflicts can arise when using the interactive rebase tool in Git, and each conflict must be resolved before the rebase can continue.
Similar to Git reset, interactive rebase alters the history of commits; it provides the ability to select the commits we want to keep and those we wish to remove. Interactive rebase uses conflicts to address the side effects caused by removing commits when it “replays” the new commit history.
Are merge conflicts stopping you from embracing the power of interactive rebase? Sit back and let GitKraken resolve conflicts for you.
Using Interactive Rebase on Shared Branches
Also like Git reset, interactive rebase is a tool that should be used with caution, especially if you’re publishing to a shared branch. Changing commit history may cause surprising repercussions for your team, so it’s typically preferable to use Git revert when you want to undo a commit on a shared branch.
Now, if you do decide to perform an interactive rebase to a remote or shared branch, it is best practice to create a backup of the branch before you start the rebase.
If you prefer to watch a tutorial video on interactive rebase in Git, click here.
Git Rebase Squash
Squashing commits can be helpful for minimizing the noise associated with long commit chains. Especially when collaborating with others, it is often preferable to squash a long commit chain into one or a few commits before merging your work into the main branch.
Using interactive rebase to squash commits can make commit logs much easier to read and maintain for your entire team.
How to Use Interactive Rebase in GitKraken
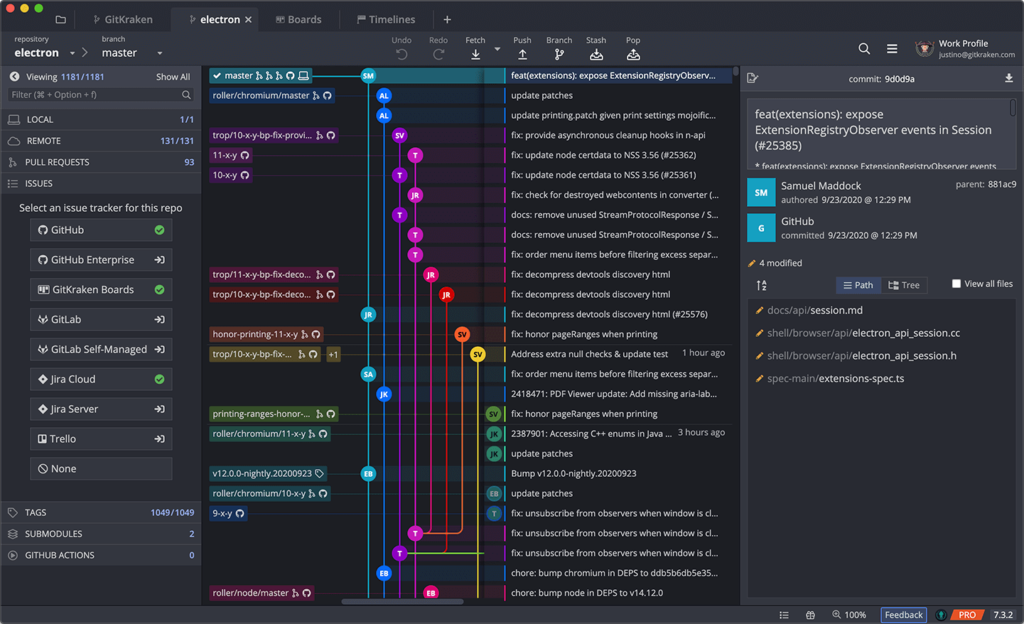
When comparing the experience of using interactive rebase in the command line, GitKraken makes this action a breeze. You will have far more confidence and control over your rebase with a visual tool for Git.
Start fearlessly optimizing your projects history today with GitKraken.
To initiate an interactive rebase in GitKraken, begin by dragging-and-dropping one branch onto your target branch and selecting the Interactive Rebase <branch name> onto <target branch name> option from the context menu. Alternatively, you can right-click on any parent commit to access the same menu option.
Upon opening the GitKraken interactive rebase tool, each commit will be set to Pick by default, but you can manually customize which action you want performed on each commit before starting the rebase.
And you can select Reword to change a commit message.
GitKraken also gives you the ability to quickly Drop commits to remove them. Plus, you can even drag-and-drop the commits in the interactive rebase tool to reorder them. That’s some serious control.
How do you Git rebase squash using GitKraken?
During the interactive rebase process in GitKraken, you can also choose to Squash commits, which not only combines the changes from the squashed commits, but also combines the commit messages, and adds them to the previous commit.
At any point during the process, you can click the Reset button to start over, or Cancel Rebase to exit the interactive rebase tool. On the other hand, if everything looks good, you can click Start Rebase and watch your commit graph magically update accordingly.
When comparing performing interactive rebase in the command line, GitKraken provides a seamless experience that allows you to clearly see what’s happening with your commits in real time. GitKraken takes the risk out of interactive rebase, and protects you and your repository from arising conflicts.
Perform interactive rebase like a pro with the GitKraken Git GUI
Git Interactive Rebase in the Command Line
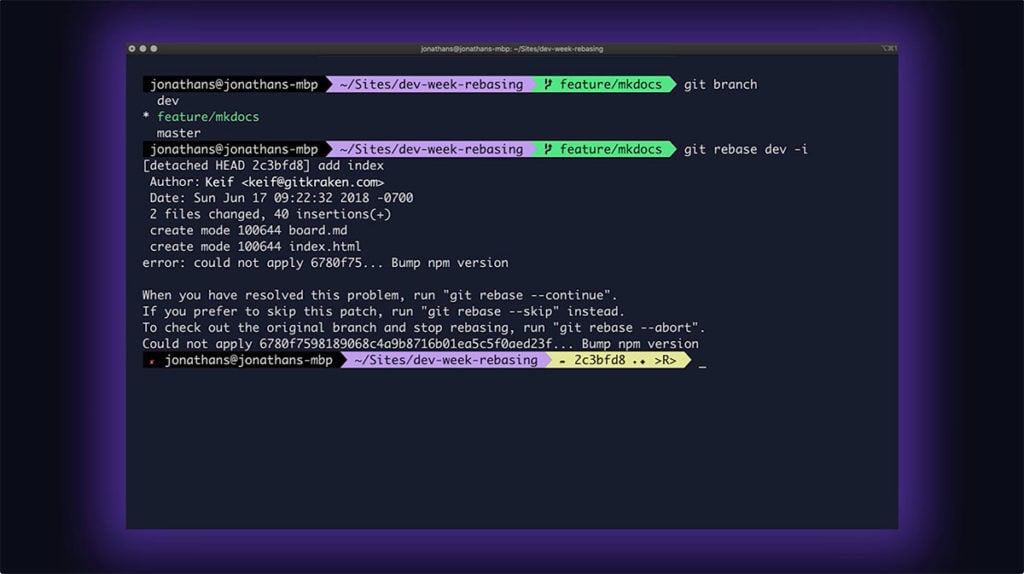
If you wish to perform interactive rebase in the command line, you will likely start by running the git branch command to see a list of your local branches and which branch you currently have checked out.
Once you have identified your target branch, you will use the following command to perform an interactive rebase:
git rebase <target branch name> -iThis is telling Git that you want to interactive rebase your currently checked out branch onto the target branch; this will also open the Git interactive rebase tool.
You will see a list of the commits on the branch you have checked out at the top, and from here, you can manually customize the action — Pick, Squash, Drop, or Reword — for each commit.
After you’ve made your selection for each commit, you can type wq for “write and quit” to initiate the interactive rebase.
Resolving Interactive Rebase Conflicts in the Command Line
As previously noted, Git will alert you of any conflicts that arise as a result of the rebase, and will not allow you to move forward until the conflicts are resolved.
Unlike in GitKraken, where you can immediately identify the conflict and resolve it with helpful context, it can be more cumbersome in the command line. In this example, you can see that Git is alerting us of a conflict with one of our commits: 6780f75.

From here, you have three options:
git rebase --continue to proceed with the rebase after you have resolved the conflict.
git rebase --skip to skip over the action causing the conflict,
git rebase --abort to cancel the rebase all together.
To resolve the conflict in the terminal, you will start by running the git status command to obtain more information about the conflicting files. You then have to open those files separately in a text editor to resolve the conflicts.
That’s called context switching. Not only does this add time to your workflow, it takes more mental energy. And these stressors add up. Remember resolving merge conflicts in GitKraken? Where you were shown the conflicting files side-by-side in a clear format, allowing you to easily choose what to keep and what to discard. Without leaving the app.
OK, moving on…
If you attempt to use git rebase --continue without resolving the conflict, Git will again tell you that you have a conflict you need to resolve. But nice try. 😉
If you don’t wish to spend time resolving the merge conflict now, you can proceed with git rebase --skip to move forward by skipping any actions that will result in a conflict.
Not only does GitKraken make the overall experience of Git interactive rebase faster and more intuitive with better visual context, the real special sauce is found when it comes time to resolve a merge conflict, a common risk of performing this action.
Who needs more conflict in their life? Download the cross-platform GitKraken Git client for Windows, Mac, & Linux today.


 GitKraken MCP
 GitKraken Insights
 Dev Team Automations
 AI & Security Controls


