In this article, we will cover how you can combine some of the most powerful tools available to developers–VS Code and Git–to start making meaningful contributions to both open source and private projects. Before we get into driving Git with VS Code let’s start with some background.
Topics Covered in this Article
Prerequisites to Using Git in VS Code
Initializing a Git Repo in VS Code
Connecting a Remote Repository with VS Code
Pushing Changes to a Remote in VS Code
Pulling Changes from a Remote in VS Code
What is VS Code?
Visual Studio Code or, VS Code, is a streamlined code editor available on Mac, Windows, and Linux that features an interactive debugger, a vast array of integrations with popular developer tools, and a plethora of extensions that make writing code easier.
According to the StackOverflow 2021 Developer Survey, VS Code was the most popular integrated development environment by far with 71% of over 80,000 surveyed indicating that VS Code was their IDE of choice. For more information regarding VS Code’s functionality and history, visit VS Code’s official “Why VS Code” site.
What is Git?
Git is a distributed approach to version control. Git was created by Linus Torvalds in 2005 to manage the development of the Linux Kernel. Put simply, Git tracks changes made to your files allowing you to revert to previous file versions if necessary.
GitLens – The Free Git Extension for VS Code That Keeps Getting Better!
With over 20 million installs, GitLens is the most popular Git extension for Visual Studio Code. It gives you valuable insights into code authorship and unlocks the full power of Git in VS Code.
In 2022, we added an all-new set of powerful features that enhance the GitLens experience, dubbed GitLens+ features. The first GitLens+ features we introduced were the Visual File History view and Worktrees. At the time of release, these features required a free account for access on locally and publicly hosted repositories, while a paid account was needed on privately hosted repositories.
However, with the release of GitLens 13 in October of 2022 —debuting the beautiful new Commit Graph—we wanted everyone to benefit from the powerful GitLens+ features on local and public repositories without any friction. So, we removed the free account barrier. Now the only requirement for access to GitLens+ features is having a Pro account for private repository use.
Our intention with GitLens+ features is to create a sustainable model that allows us the ability to continue to heavily invest in the free and open source core of GitLens—features that enable greater productivity, safety, ease-of-use, and more—while creating a set of additional, but completely optional, features designed specifically for professional developers and teams.
To help you identify GitLens+ features, they are marked with a ✨symbol.
Want to be a step ahead when it comes to using Git and VS Code? Download the GitLens extension to access valuable file history and code authorship information to start coding with confidence.

GitLens supercharges the Git capabilities built into VS Code. Whether you’re a seasoned Git developer or just getting started, GitLens makes it easier, safer and faster to leverage the full power of Git. This GitLens tutorial will show you how to use GitLens in VS Code and get the most out of the tool. Sign up for GitLens+ to get the most out of your experience – it’s free!
Now let’s start looking at how to go through a Git workflow using VS Code. You will learn how to create a Git repository, commit changes, connect a remote, push changes, and leverage the GitLens extension throughout the process to make using Git in VS Code even more powerful.
Prerequisites to Using Git in VS Code
Before you can start leveraging the Git integration in VS Code, you’ll first need to make sure you have Git downloaded and configured. To check whether or not you have Git installed, open the integrated terminal in VS Code by using the keyboard shortcut CTRL + and then type git --version. If the terminal returns git version followed by any version number, that indicates that you do in fact have Git installed. If nothing is returned, you will need to navigate to the https://git-scm.com/downloads for your operating system.
Next, you should verify that Git is configured properly by setting up your name and email. To check if you have already configured Git navigate to the terminal and run
git config --global --list.
If Git has been configured, the terminal will return your set username and email. If this is not the case, you need to configure Git by completing the following:
To set your name run:
git config --global user.name <your name>
To set your email run:
git config --global user.email <your email>
This information is required to use Git and must be entered before committing any of your changes. For additional information regarding Git setup and initial requirements, view the official Git documentation.
Opening a Git Repo in VS Code
Once you’ve confirmed that Git is properly installed and configured on your machine, you’ll need to either initialize a local repository or clone and open an existing project.
Initializing a repo can be accomplished in a variety of ways, and the process you elect to use depends on your desired workflow and current circumstance. Generally, developers Git clone a remote repository when they want to contribute to an existing project, and create a new repository when starting an entirely new project.
Clone a Git Repository with a URL in VS Code
To clone an existing repository to your local machine using a URL with VS Code, follow these steps:
1. Select the source control icon located on the activity bar
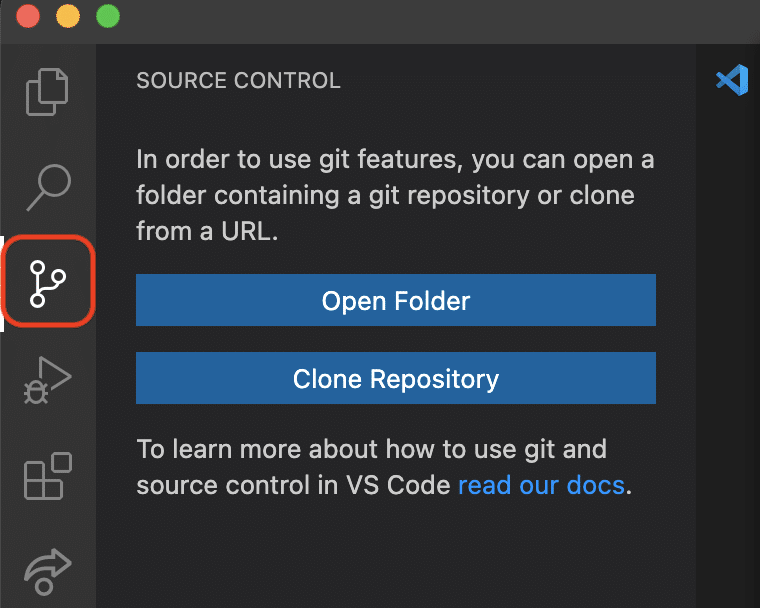
2. Then select Clone Repository
3. Navigate to your preferred repository hosting service, like GitHub
4. Navigate to the search bar at the top left corner, search for your desired remote repository, and select the repo

Search for your desired remote repository
5. Select the green Code button
6. Copy the remote repository URL
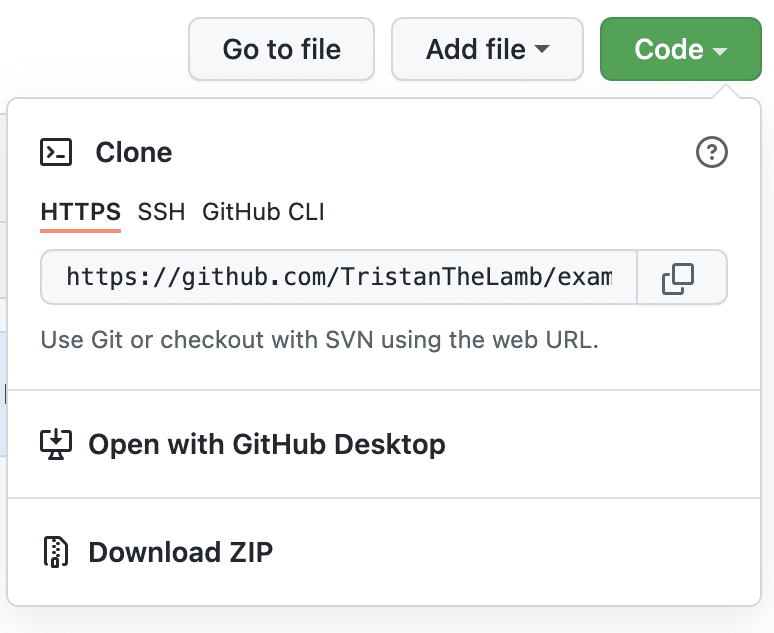
Copy the remote URL
7. Paste the URL into the VS Code Command Palette
From there, you will be prompted to select a save location for the project on your local machine. Once this has been accomplished, you can start working against the repository.
Cloning an Existing Git Repo with the VS Code Command Palette
You can clone an existing repo to start working in your local environment. To clone an existing Git repository in VS Code, follow these steps:
1. Select the source control icon located on the activity bar
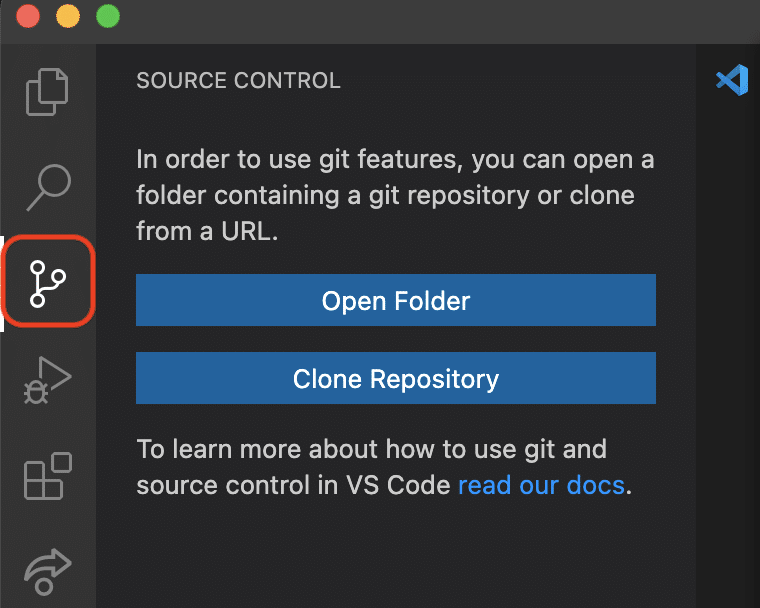
2. Select Clone Repository
3. From the Command Palette dropdown, choose the hosting service from which you want to clone a repository, like GitHub
4. Select the remote repository you want to clone
The project will be copied to your local machine and you can start working.
Initializing a New Git Repo using the VS Code Terminal
To initialize a new Git repo using the terminal in VS Code, start by creating and naming a new folder on your local machine.
Next, simply click into the VS Code terminal and run git init <your-folder’s-name>. This will open the folder in VS Code and automatically create the Git metadata files in a .git folder within your project.
Initializing a New Git Repo in VS Code Using the Side Bar Buttons
You can also choose to initialize a repository using the VS Code Side Bar buttons. To initialize a repository this way:
1. Create and name a new folder on your machine
2. Go to VS Code and select Open beneath the Start menu on the main screen
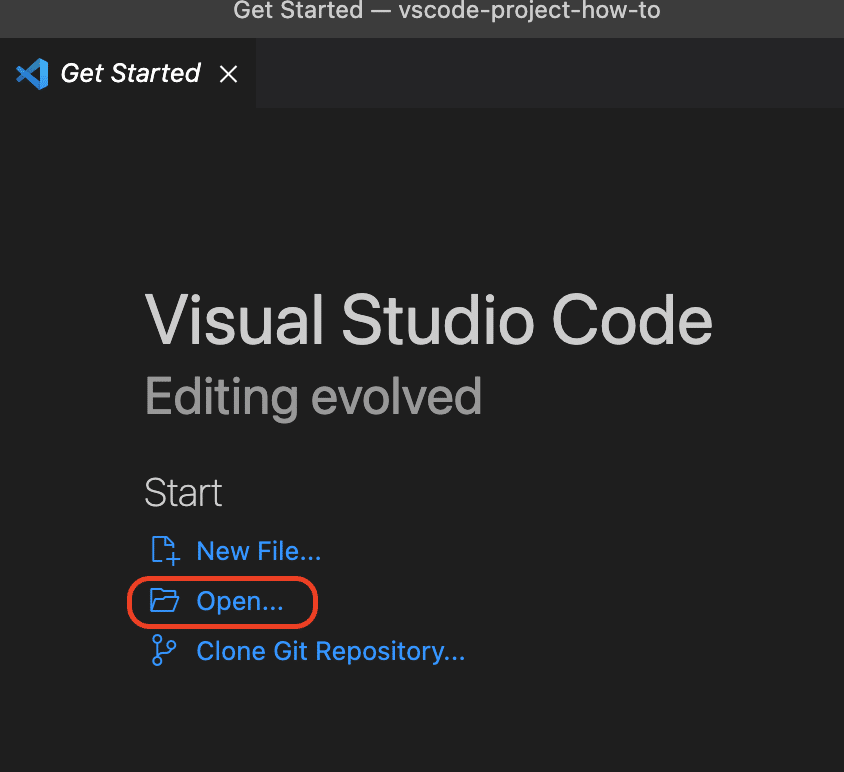
3. Open your newly created file
4. Select the source control icon from the Activity Bar
5. Click Initialize Repository
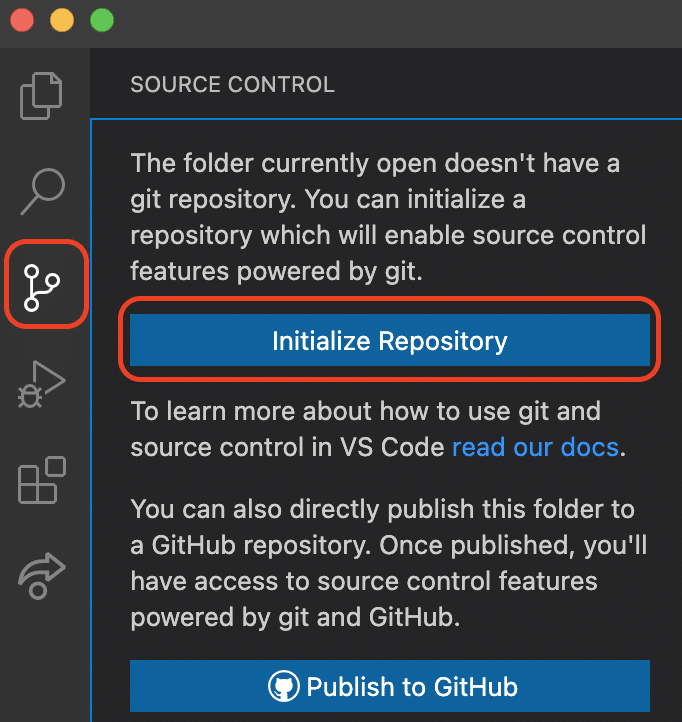
The Git Workflow in VS Code
Once you’ve made changes to your project that you want to make sure are saved, it’s a good idea to commit those changes. It can be helpful to think of a commit like a save point in your work.
You can view, amend, and build on top of old commits as your project grows. The Git workflow for committing changes looks like the following:
- Edit your project
- Stage your changes
- Write a commit message
- Commit
Using GitLens to Keep Track of Changes in VS Code
✨Commit Graph
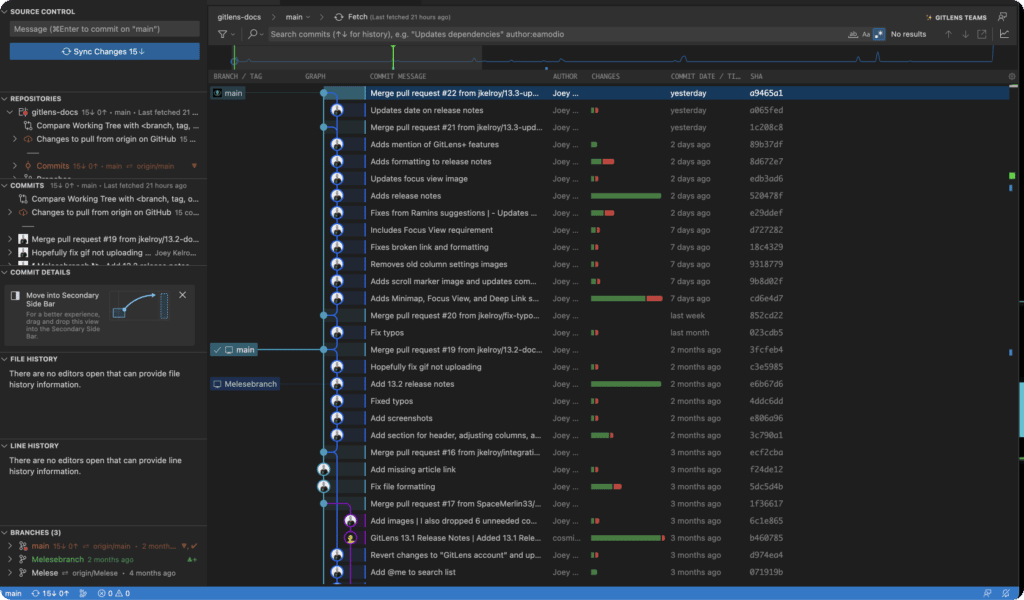
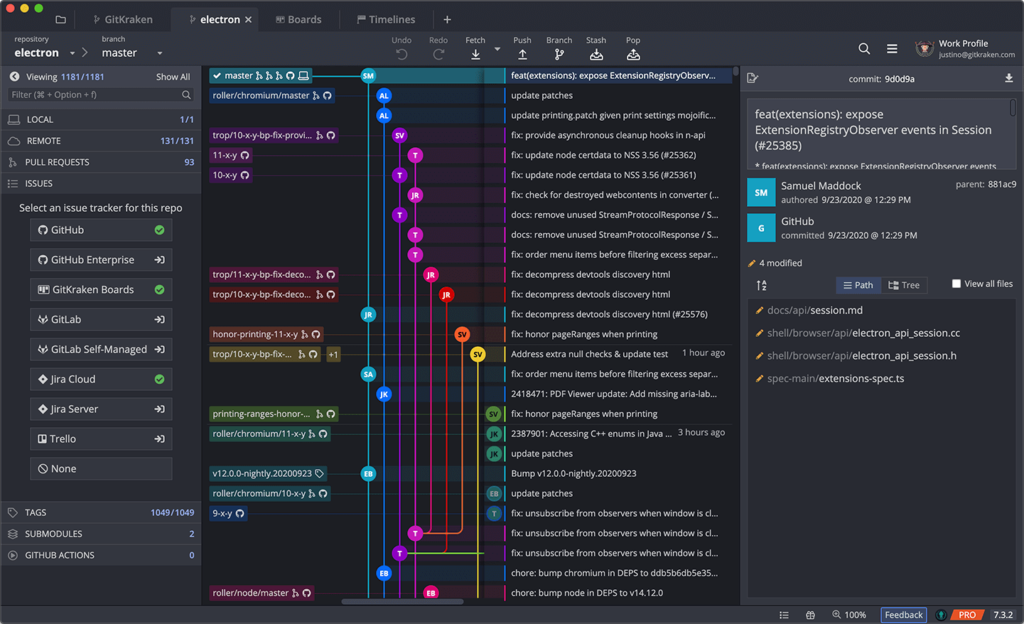
The GitLens Commit Graph enables you to effortlessly visualize and monitor all ongoing work. Providing a wealth of information about each commit. You can see the author, date, and commit message for each node, and you can even see which files were changed in each commit. This makes it easy to understand the evolution of your codebase and to identify areas that may need attention.
The Commit Graph is also interactive, with full-featured context menus that make it easy for you to interact with Git directly. Perform various actions such as merging, cherry-picking, and reverting changes or use the rich Commit Graph search.
With GitLens’ Commit Graph, tracking and managing work progress has never been simpler or more efficient.
- Interact with branches, commits, tags and more with right-click context menus
- Double click a branch to checkout a branch
- Rich search and filters for commits
- Get information about Pull Requests
- Activity minimap for quickly viewing repo activity
- Change Column to visualize changes made to files in each commit
- Scroll Markers quickly find and jump to points of interest
The Commit Graph is available to all users working on public repositories, and requires no account. Additionally, users with a paid GitLens+ subscription can use the Commit Graph with private repos.
Inline Blame Annotations and CodeLens
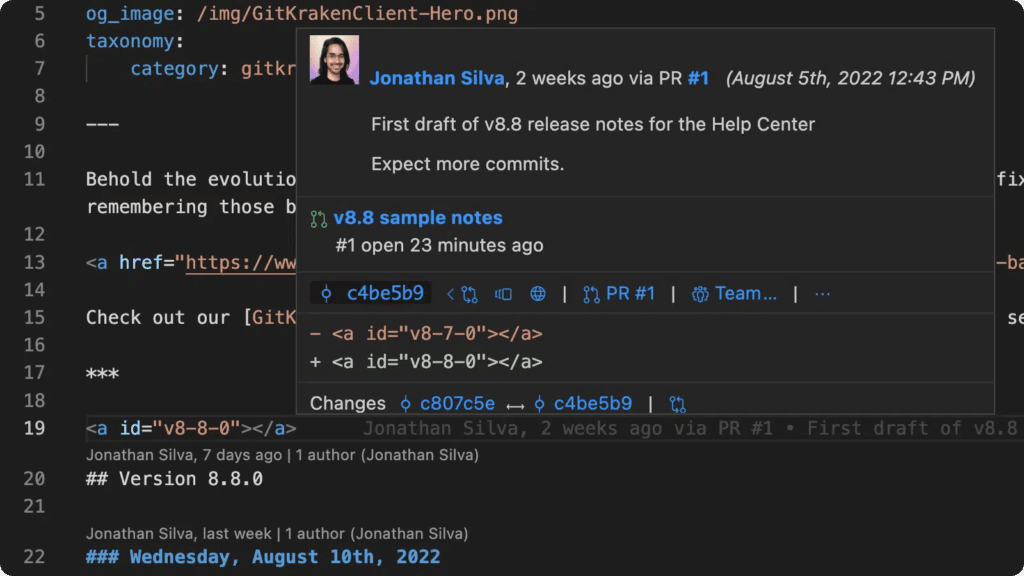
GitLens Inline Blame Annotations display the author and commit information for each line of code in a file. This information is displayed in the form of a tooltip that appears when the user hovers over a line of code. The tooltip shows details such as the author’s name, username, and the commit message that the change was made in.
This feature helps you track changes and understand the history of each line of code. It also enables you to trace back the changes made to a particular line, abd understand who made the change. Blame Annotations can be used to identify code contributions made by different team members, which helps in assigning credit and responsibility for the code. It also enables users to identify and track down bugs and errors in the code, making it easier to troubleshoot issues.
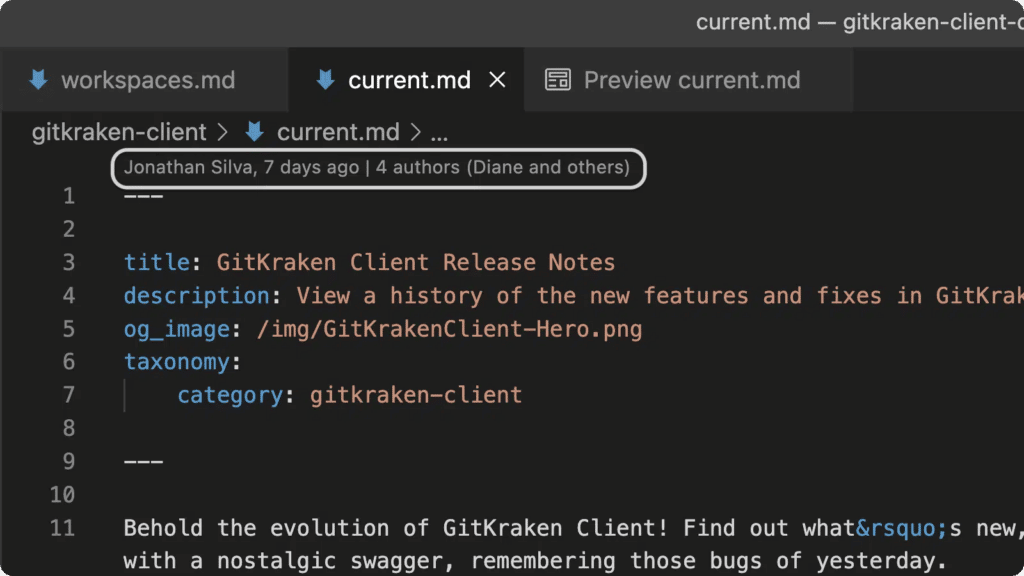
CodeLens, one of the most powerful tools inside VS Code, provides clickable links exposing commit details and allows you to select from a quick pick menu to compare, navigate and further explore each commit.
File Annotations
With File Annotations, you can view detailed information about your Git repository and files, all in one convenient place. When you toggle File Annotations, GitLens provides a sidebar that displays information about the currently open file. You can see the commit history for the file, including the author and date of each commit, and you can even view the full commit message by hovering over a particular commit.
GitLens File Annotations also shows you the changes that were made to the file in each commit. You can see which lines were added, modified, or removed, making it easy to track changes and understand the evolution of the file over time. File Annotations includes an interactive code heatmap, which visually displays which lines of code were changed the most. This makes it easy to spot areas of the code that may need attention or optimization.
And if you’re working in a team environment, File Annotations can help you identify who made changes to the file, and when. You can see the contributions made by each team member, and you can quickly navigate to the commit history for each change.
Status Bar Blame
Quickly and easily see the author and commit information for the currently selected line of code with Status Bar Blame. This information is displayed in the Visual Studio Code status bar, right at the bottom of your editor window. Status Bar Blame also displays information about the age of the code, so you can see how long ago it was last modified. This can be incredibly useful for identifying stale or outdated code, or for understanding the context of a particular code change.
Just click on any line of code, and GitLens will display the author, commit, and age information in the status bar.
Commit Details
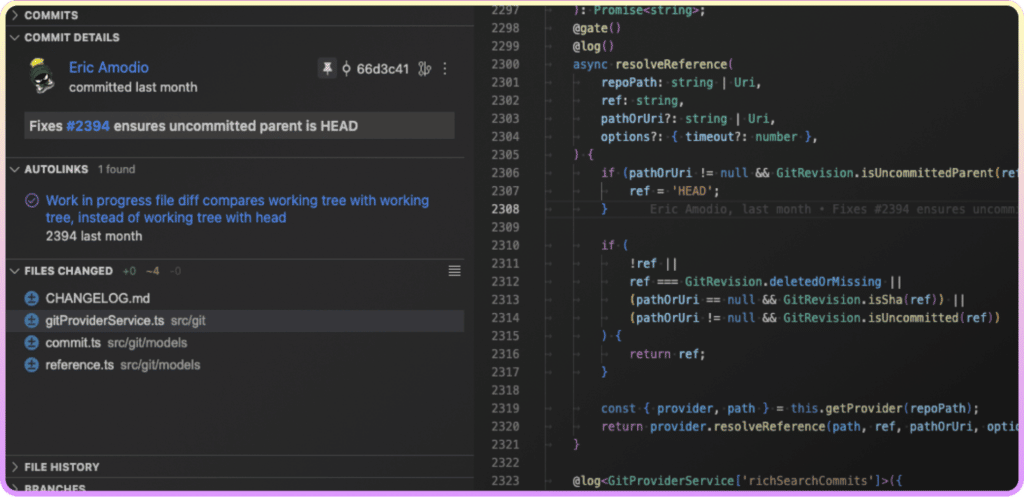
The Commit Details view provides rich details about commits and stashes. Quickly view information about the commit’s author, commit ID, links to associated issues and pull requests, changed files, and more.
When unpinned, the Commit Details view contextually follows you while navigating through files in the editor as well as selecting commits and stashes within the ✨ Commit Graph, Commits view, Stashes view, Interactive Rebase Editor, and the ✨ Visual File History. You can also open a commit or stash in the Commit Details view from the hovers, context menus, and quick pick menus.
Staging Changes in VS Code
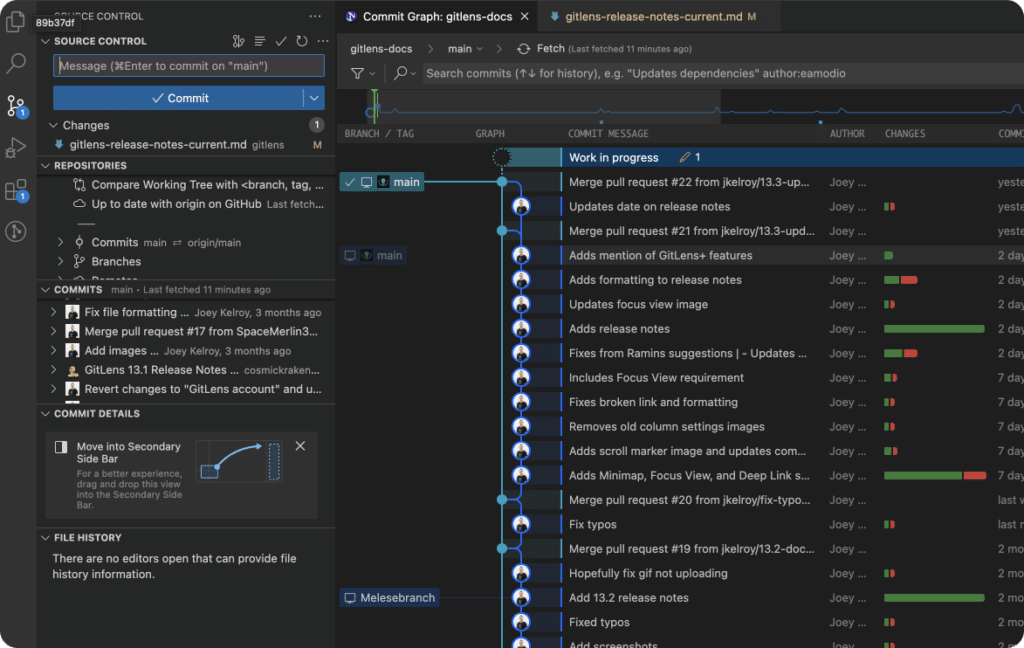
GitLens – WIP on Commit Graph
Your Work In Progress or WIPs in GitLens, will appear on the GitLens Commit Graph as a “Work in progress” row after you’ve made changes to your file and saved the file. With a single right click, you can access the WIP contextual menu. Giving you access to a range of useful options, including Stash All Changes, Open Details, and Open Source Control. These features allow you to more effectively manage your WIP.

VS Code UI
VS Code makes it easy to identify how many unstaged changes your project has at any given time by referencing the source control icon on the Activity Bar, where a blue circle indicates how many unstaged changes your project has.
When you’re ready to stage your changes, you can stage individual files by hovering over the file and selecting the + icon.
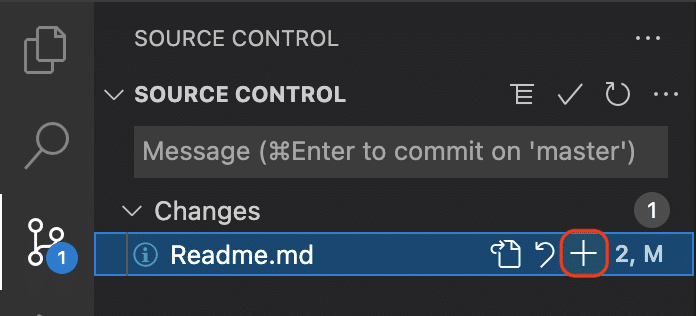
To stage an individual file from the terminal, simply run git add <file name>.
Or, if you have multiple files to stage and you prefer to stage them all at once, you can navigate to Changes and select the + icon.
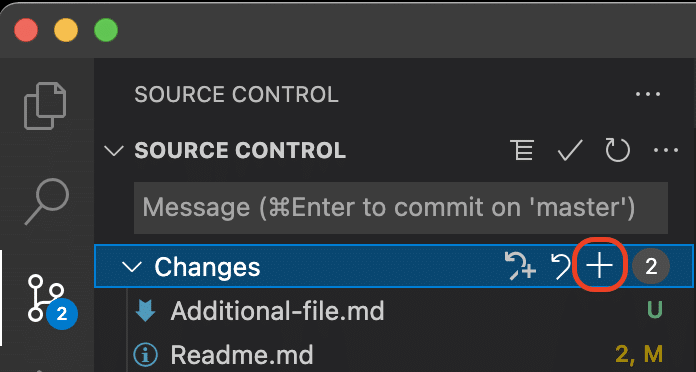
Stage all changed files at once
To stage all of your changes from the terminal, simply run git add --all.
*Warning: Staging and committing all of your changes together is a bad habit. Files staged and committed together share the same commit message, which can make your Git log confusing for you and other contributors. Committing your changes often limits the need to commit unrelated chunks of work, and will save you time in the long run.
Committing Changes in VS Code
Once your desired files are staged, you are ready to Git commit your changes. Compose a clear commit message that conveys the purpose for your changes in the section marked Message, just above where you staged your files, and then select the ✓ icon to commit.
To commit using the VS Code integrated terminal, run git commit -m. The -m flag is used to include a commit message that explains how your changes affect the project. Including a Git commit message is a best practice; this enables you and other project contributors to more easily track changes made to the project.
To verify that your commit was successful using the terminal, run git log. The terminal should return the most recent commit and its associated message.
If you prefer a more visual approach, you can confirm that your commit was successful by navigating to the Timeline view in VS Code. To access this view, select the explorer icon from the Activity Panel and then select Timeline.
Accessing Valuable Commit History Information with GitLens
Once your changes are committed, GitLens blame annotations become even more valuable.
With GitLens blame annotations, you can identify who made specific changes, when the changes were made, the commit SHA, and more. To access the annotations in GitLens, simply select and hover over the desired committed change and the information will appear beneath the line of code.
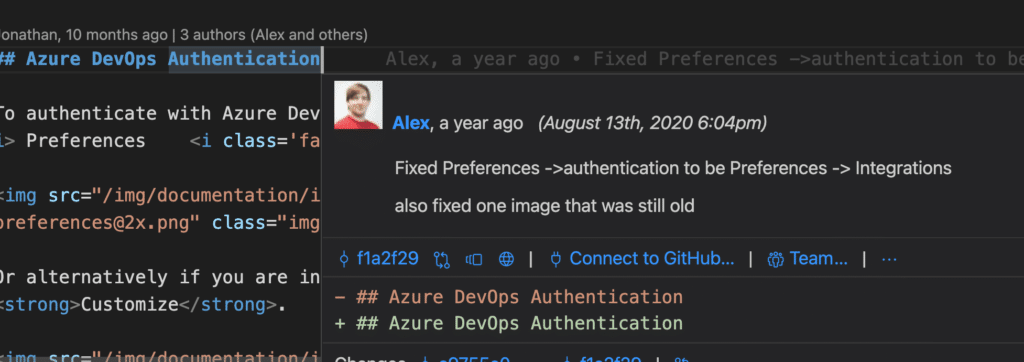
GitLens Blame Annotations
You can also use GitLens to navigate through the revision history of your project. If you want to see how a file has changed over time or compare the current state of your project to where it was a week ago, GitLens can do exactly that.
To access the revision history of your desired file in GitLens, perform the following actions:
- Select into your desired file
- Click the icon that looks like a circle with an arrow pointing to the left, located at the top right of your screen to go back to previous iterations of your project.
Connecting a Remote Repository in Git with VS Code
Hosting a project on a remote repository in Git is how most developers share their work with other contributors. Whether working on a project as part of an enterprise team or an open source contributor, the remote repository is the most up-to-date version of the project and is regarded as the ultimate source of truth. If you want others to be able to see your code and add to your project, you’ll need to set up a remote repository for them to access the project’s codebase.
To create a remote repository, navigate to GitHub, and select New.

Creating a new GitHub remote repo
After selecting New your screen should look like something like this.
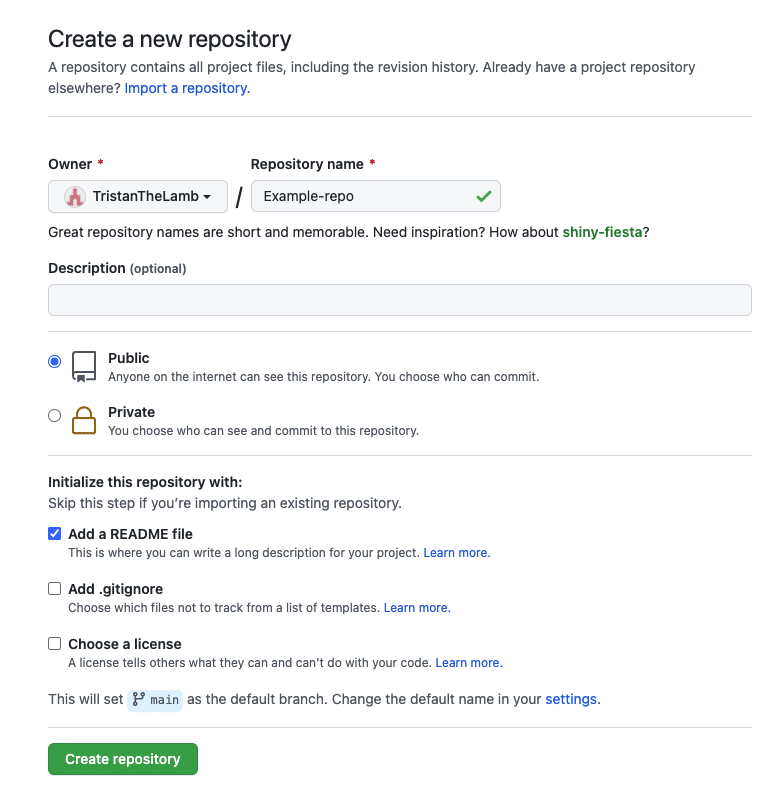
A new GitHub remote repository being created
Enter the remote repository name and select Create repository. Once the remote repository is created, you have the option to copy the remote’s URL using either HTTPS or an SSH key. Once you have copied the URL, you can connect your local project to the remote repository using either the VS Code terminal or Command Palette.
Connecting a Remote Repo Using the VS Code Integrated Terminal
If you are a keyboard-first type of developer, you’ll likely want to use the terminal to connect your local to the remote. You can do this in VS Code following these steps:
- Copy the remote repo URL
- Navigate to the VS Code terminal
- Run
git remote add origin <paste the URL>and hit Enter
Connecting a Remote Repo Using the VS Code Status Bar
If your GitHub account is connected to VS Code, you can quickly create a remote repository directly from VS Code. To do this in VS Code, follow these steps:
- Navigate to the Status Bar at the bottom of the window
- Select the icon that looks like a cloud with an arrow pointing up
- From the Command Palette, select publish either to a public or private repo
Regardless of how you connected to a remote, you can confirm that your project is in fact connected by looking at the Status Bar icons at the bottom of your window. If your local project is not connected to a remote repository, the Status Bar will show an icon that looks like a cloud with an arrow pointing up. If a remote is connected you will instead see an icon that looks like a refresh circle.
Additionally, you can navigate to the source control icon on the Activity Bar and then select Remotes to verify that your repo is connected. If a remote is connected the Remotes bar will look like the following: REMOTES (1).The number in the parenthesis indicates the number of connected remote repositories.
Pushing Changes to a Remote Repo in Git with VS Code
Once your remote repo is connected, you can start sending the changes you make against your local project to the remote through a process called pushing. Pushing often helps keep your remote repo up-to-date with your recent changes, and makes it possible for other project contributors to work with those changes.
To Git push your staged changes from the Side Bar simply select the source control icon and then select Sync Changes.
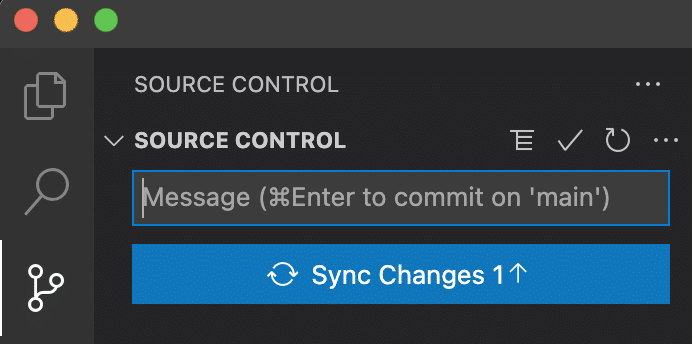
Push changes to the remote with the Side Bar
To push your commited changes to the remote using the integrated terminal, simply run git push origin main.
Leveraging GitLens to Identify Project Contributors and Their Code
GitLens can help you identify all of the contributors to a project by adding a contributors view. This can be helpful when working on a large project, as it allows you to see all the collaborators as well as their contributions to the project by simply clicking on their profile.
To add this view, simply navigate to the VS Code Command Palette, search GitLens: Show Contributors View, and select it from the dropdown menu. A new option will appear under the source control icon in VS Code depicted below:
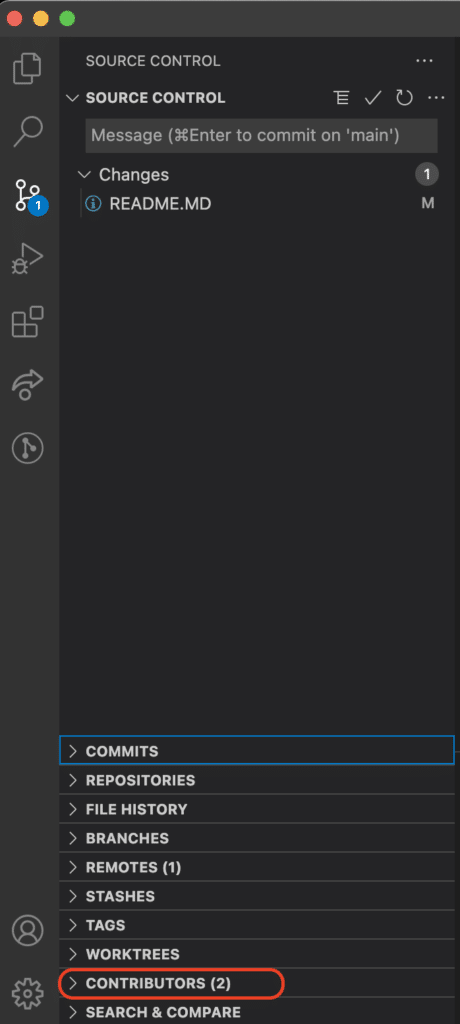
Select the dropdown arrow to see all of the project contributors.
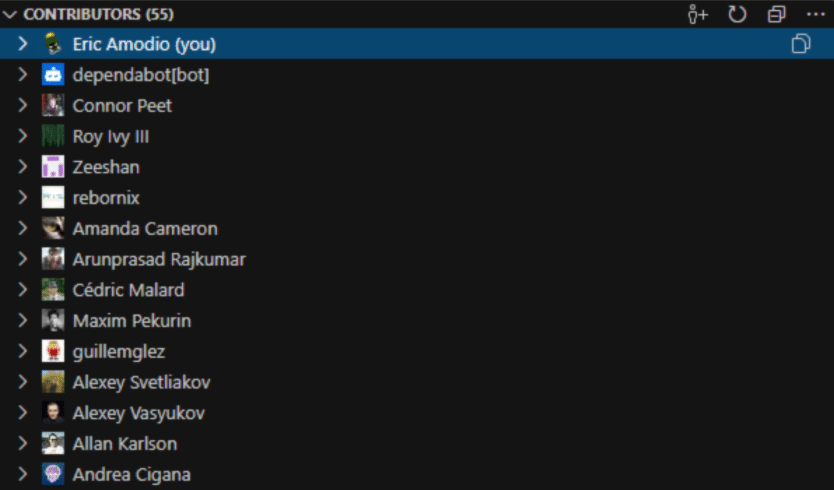
GitLens Contributors
Thousands of developers are leveraging GitLens’ plethora of view options, including the contributors view, blame annotations, and more to improve their team collaboration.
Pulling Changes from a Remote Repo in Git with VS Code
Pulling changes is the process developers use to sync their local project with any updates contained on the remote. If you’re working on a project with multiple contributors, it’s a good idea to periodically pull changes so you can see what others are working on and remain up to date on how the project is progressing.
You can easily pull changes from the 3 dot ellipsis on the VS Code Side Bar. First, click the ellipses from the source control view, and then select Pull from the dropdown menu.
To pull changes from the integrated terminal, run git pull.
Ready…Set…Contribute with Git and VS Code!
You now have the tools to follow a basic Git workflow in VS Code! Knowing how to use VS Code to drive Git can help you start collaborating with your team members more effectively, and makes it easy to start making meaningful contributions to open source projects. Git can be daunting, but VS Code, especially when combined with GitLens, provides you with the necessary tools, powerful functionality, and intuitive UX to guide you towards success.


 GitKraken MCP
 GitKraken Insights
 Dev Team Automations
 AI & Security Controls