You can create a Jira GitHub integration through Git Integration for Jira. This tool will allow you to use smart commits, create branches and pull requests on your GitHub repositories directly from Jira, index repositories with webhooks, and more!
Developed by Atlassian in 2002, Jira is a project management tool that aims to help software development teams effectively track their projects. With features designed specifically for agile development like scrum, kanban, issue tracking, and more, Jira has become a popular tool in the tech stack of many development teams.
GitHub is a widely utilized repository hosting service that allows developers to collaborate on projects. By hosting a remote repository on GitHub, team members can make changes to a repository locally, push their changes to the remote on GitHub, as well as pull changes their teammates have added.
Because using both Jira and GitHub can increase project visibility, make it easier for teams to work collaboratively, and dramatically amplify productivity, many choose to leverage both tools in their workflows. In this article, we’ll cover how you can use Git Integration for Jira to combine the power of Jira and GitHub and take your workflow to the next level.
Creating a Jira GitHub Integration
Jira GitHub Integration: Pull Request
GitHub Jira Integration: Get Started Today
Connect Jira + GitHub
To start your Jira GitHub integration, you’ll need to install Git Integration for Jira from the Atlassian Marketplace. If you haven’t used Git Integration for Jira before, you have the option to begin a free 30-day trial. Once you have Git Integration for Jira installed, you can begin connecting your GitHub repositories to your Jira instance. To start connecting your GitHub repositories you’ll need to set up the GitHub integration using the following steps:
- From your Jira instance, select Apps from the top navigation bar
- From the subsequent dropdown menu, select Git Integration: Manage integrations
- Select the Add integration button from the center of the page
- Select Git service integration (Recommended)
- Depending on your preferred connection method, select either GitHub.com - OAth or GitHub.com - Personal Access Token
- Beneath the Connect Git service header, select the blue Connect GitHub.com button
- Enter your GitHub account information and select Sign in
Your Jira GitHub integration should now be complete. Now you can connect your GitHub repositories by selecting the checkbox next to each repo’s name. If you want to connect all of your GitHub repositories to Jira, simply select the checkbox on the left of your GitHub username.
Connecting GitHub repositories to Git Integration for Jira is safe, fast, and intuitive! You can connect one or multiple repositories with a single integration.
Start Free Trial of Git Integration for JiraJira GitHub Smart Commits
You can further integrate Jira and your GitHub repos by leveraging smart commits. Smart commits allow you to perform a variety of actions on a Jira issue using specific syntax in a commit message. This Git Integration for Jira feature helps developers avoid context switching between their development tools and Jira, and affords them more time to write code. Some of the actions you can take on a Jira issue using smart commits include:
- Adding a comment
- Record time tracking
- Transition to a particular workflow state
- Assign an issue to a team member
- and more!
As long as the email in your Git config matches the email used for your Jira profile, you can start using smart commits for any connected repository.
To create a smart commit, begin your commit message with an associated Jira issue key, followed by a # and then the command for the action you want to take against the issue. Here are a few examples of smart commits you can start leveraging immediately:
Add a Comment
ISSUE_KEY #comment
Record Time Tracking Information
ISSUE_KEY #time [Some amount in Jira time syntax]
*Jira administrators must have enabled this feature for this action to work
Transition an Issue
ISSUE_KEY #
*You must have the necessary Jira permissions to transition an issue for this action to work
Visit Git Integration for Jira’s official documentation for more advanced actions available with smart commits.
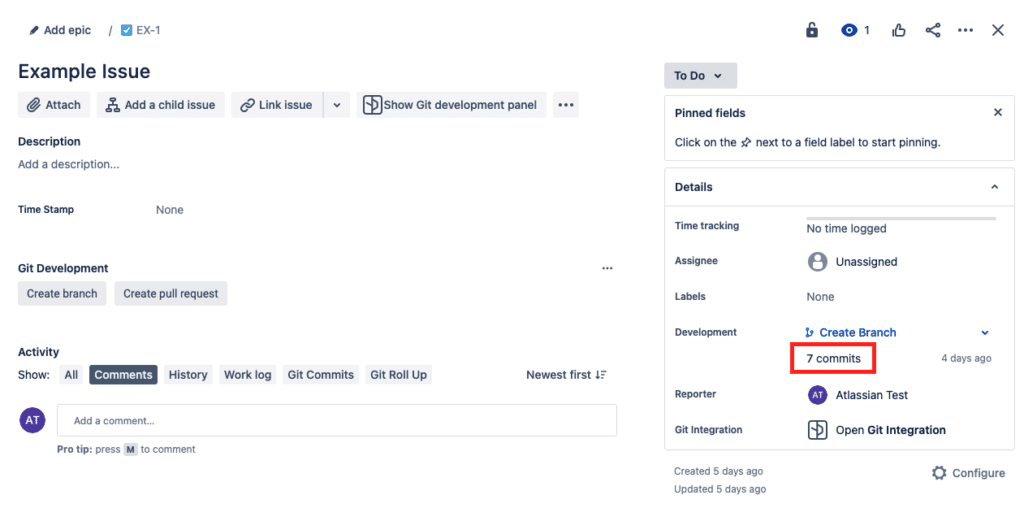
You can view a list of all the Git commits associated with a Jira issue from the Details panel of an issue. You can open any associated commits in GitHub, directly from the issue, which makes it easy to quickly assess the status of a project and review code.
Jira GitHub Create Branch
The Jira GitHub integration also allows you to create branches associated with a Jira issue. To create a branch from a Jira issue, perform the following:
- Select a Jira Issue
- Click the Show Git development panel button at the top right of the issue
- Select the Create branch button from the Git Development panel
- From the Repository dropdown menu, select the desired GitHub repository where you want to create the branch
- Select a branch from the Source branch dropdown menu
- Make any desired changes to the Branch name field. You’ll notice that the Jira GitHub integration autopopulates a branch name based on the issue key and summary.
- Select the blue Create branch button at the bottom right
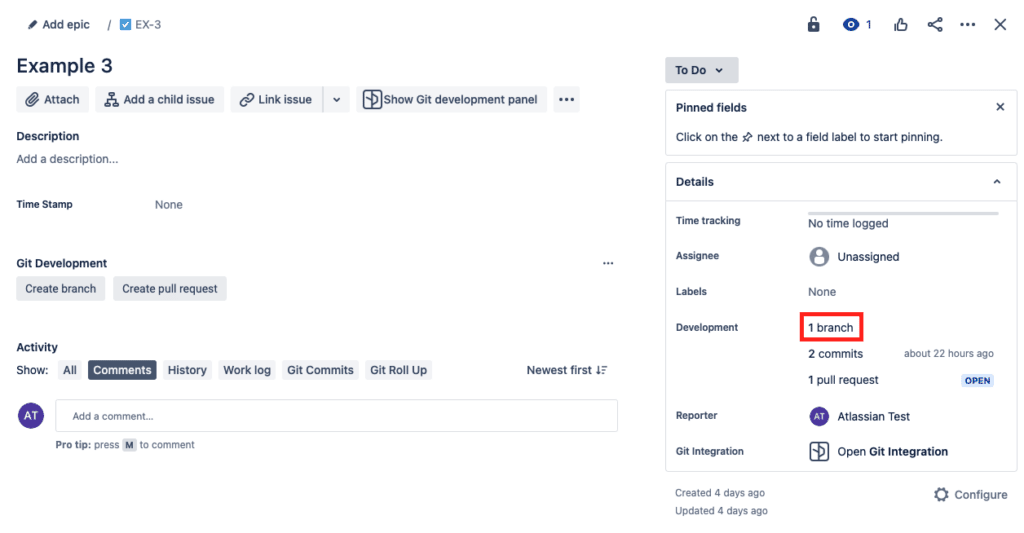
This will create a new branch in your GitHub repository, associated with the Jira issue that you created the branch from. To work on your newly created branch from your local project, simply perform a Git pull. Similar to the smart commits, you’ll be able to see a list of branches associated with the Jira issue, on the Details panel of the issue.
Jira GitHub Integration: Pull Request
Using the Jira GitHub integration, you can also create pull requests directly from Jira. Follow these steps to create a pull request from a Jira issue:
- Select a Jira Issue
- Click the Show Git development panel button at the top right of the issue
- Select the Create pull request button from the Git Development panel
- From the Repository dropdown menu, select the desired GitHub repository where you want to start the pull request
- Select the branch that you want to merge from the Source branch dropdown menu
- Select the branch you want to merge into from the Target branch dropdown menu
- Make desired adjustments to the pull request Title field. Git Integration for Jira automatically populates this field with the following format issue key merge to
- Select the blue Create pull request button at the bottom right
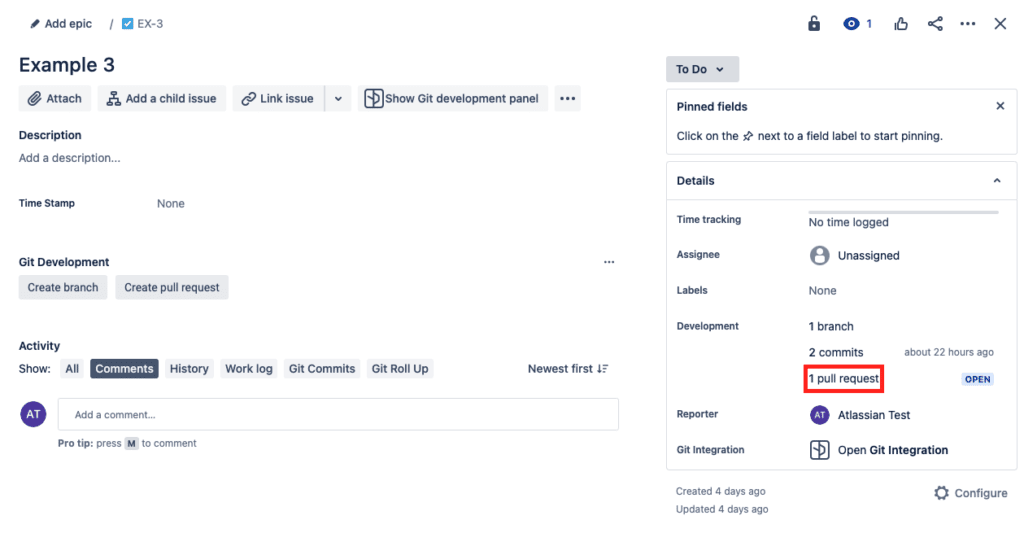
Congratulations! You have now created a pull request directly from Jira. You can view your pull request by going to the associated Jira issue and navigating to the Details panel on the right. From here you can see how many pull requests are associated with the issue and the status of each pull request.
Jira GitHub Webhooks
If you are using Jira Cloud or Jira Server, you can also create webhooks or indexing triggers that will quickly reindex your repositories from the remote. You can configure your webhooks to reindex your connected repositories when certain actions, like a Git commit, are executed. To add webhooks to your connected GitHub repository complete the following steps:
Jira GitHub Webhooks for Jira Cloud
- From your Jira dashboard, select Apps from the top toolbar
- From the dropdown menu, select Git Integration: Manage integrations
- From the left sidebar select Indexing triggers
- Toggle the option beneath the indexing triggers enabled heading to enabled
- Copy the Webhook URL
- Navigate to GitHub and select the repository you want to configure webhooks for
- Select settings from the top toolbar
- From the left sidebar, select Webhooks
- Select the Add webhook button at the top right
- Paste the Webhook URL you copied from Jira into the Payload URL field
- From the Content type dropdown, select application/json
- Navigate back to Jira and copy the Secret key
- Go back to GitHub and paste the Secret key in the Secret field
- Select which events you want to trigger the webhook like commits, new branches, etc.
- Select the green Add webhook button
Jira GitHub Webhooks for Jira Server
- From your Jira dashboard, select Git from the top toolbar
- From the dropdown menu, select Manage repositories
- From the left sidebar select Webhooks
- Select the enabled option for webhooks
- Copy the Webhook URL
- Navigate to GitHub and select the repository you want to configure webhooks for
- Select settings from the top toolbar
- From the left sidebar, select Webhooks
- Select the Add webhook button at the top right
- Paste the Webhook URL you copied from Jira into the Payload URL field
- From the Content type dropdown, select application/json
- Navigate back to Jira and copy the Secret key
- Go back to GitHub and paste the Secret key in the Secret field
- Select which events you want to trigger the webhook like commits, new branches, etc.
- Select the green Add webhook button
Unlock new levels of productivity, save yourself time, and increase team visibility by integrating Jira and GitHub with Git Integration for Jira.
Start Free Trial of Git Integration for JiraGitHub Jira Integration – Get Started Today
Connecting Jira and GitHub can unlock a new level of productivity and efficiency. The Jira GitHub integration, made possible through Git Integration for Jira, allows you to easily drive Jira with your GitHub repository. You can see a comprehensive list of commits and branches associated with a Jira issue, open commits and branches directly from an associated issue, eliminate repetitive tasks like copying over commit message information, and more.


 GitKraken MCP
 GitKraken Insights
 Dev Team Automations
 AI & Security Controls